To password protect a file in Windows 10, you have two main options: using BitLocker for folders or 7-Zip to create password-protected archives. With BitLocker, you can encrypt an entire folder by creating a virtual drive, requiring a password for access. Alternatively, 7-Zip allows you to password-protect individual files or groups of files by compressing them into a secure archive. While BitLocker provides robust security for folders and their contents, 7-Zip is more versatile for protecting specific files and is useful for securely sharing files.
Understanding the Importance of File Protection

1. Protect Sensitive Information
Password protection ensures that only authorized individuals can access the contents of your file. This is crucial for sensitive financial documents, personal records, and confidential work files.
2. Prevent Unauthorized Access
By setting a password, you can prevent unauthorized users from opening and modifying your files, adding a layer of security to your data.
3. Maintain Privacy
Password protection helps maintain your privacy, ensuring that your personal and confidential files remain personal and confidential.
Methods To Password Protect A File In Windows 10:
Method 1: Password Protect a Folder Using BitLocker

BitLocker is a powerful encryption tool included with Windows 10, primarily designed to encrypt entire drives, but it can be used creatively to protect specific folders.
1. Encrypt the Drive:
- BitLocker is generally used to encrypt entire drives like your system or external storage devices. However, we can use it to protect specific folders by creating a virtual drive within an encrypted container.
2. Open File Explorer:
- Begin by opening the File Explorer. You can do this quickly by pressing
Win + Eyour keyboard or clicking the File Explorer icon in your taskbar.
3. Choose the Folder:
- Navigate to the folder you wish to protect. This could be a folder containing sensitive documents, personal photos, or any other files you want to secure.
4. Right-click the Folder:
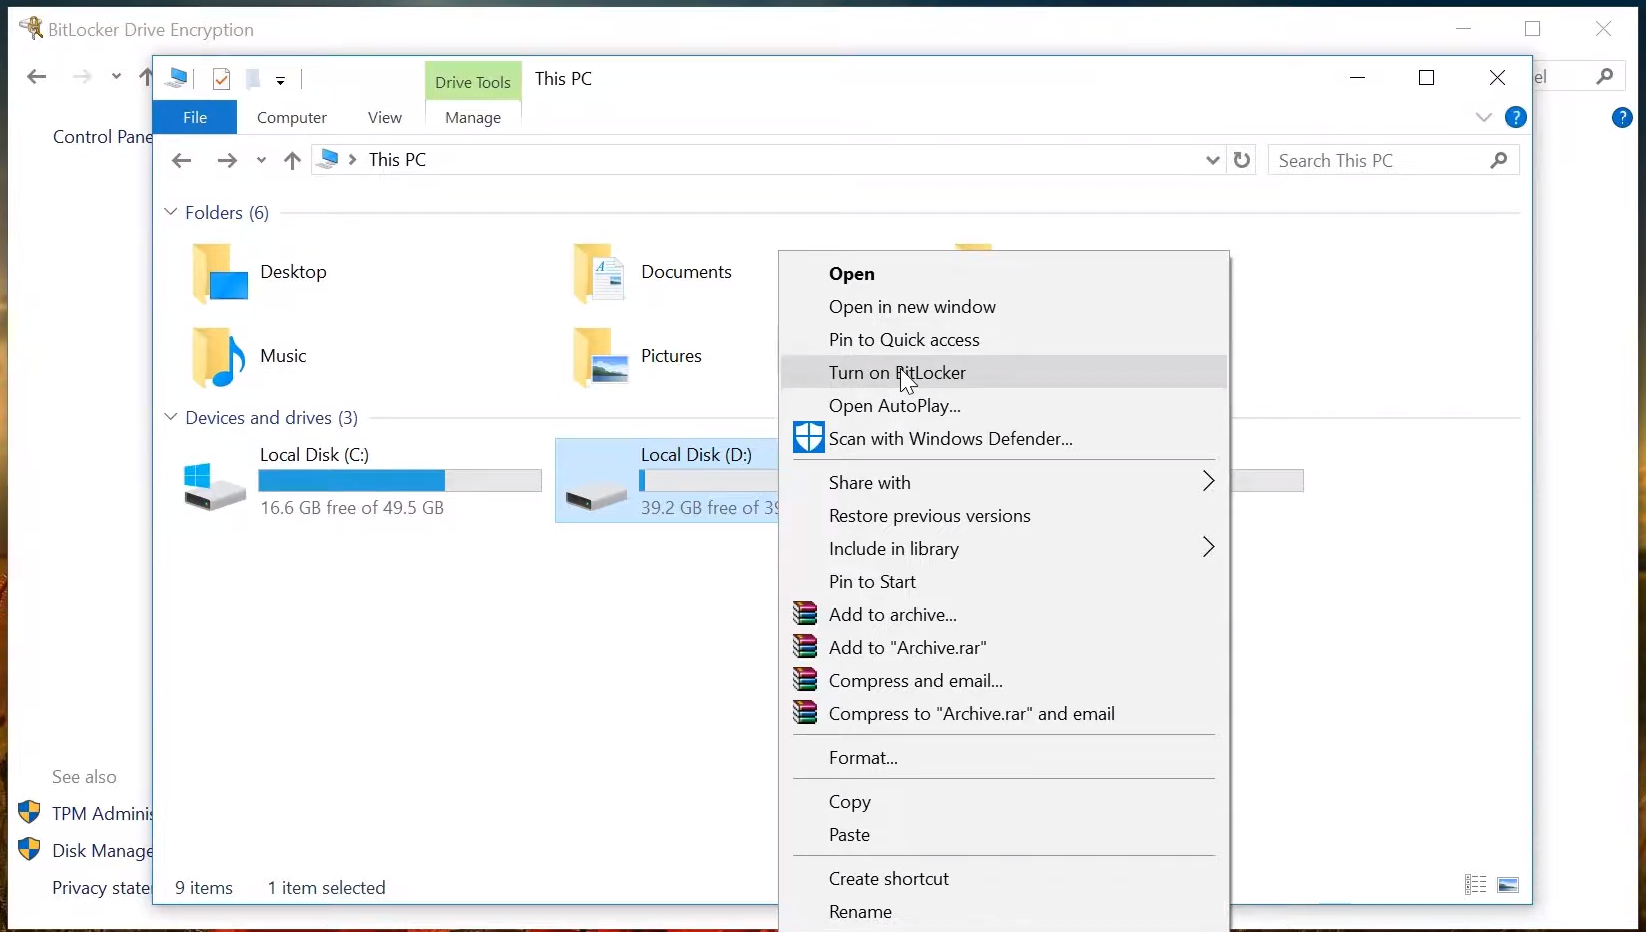
- Right-click on the folder you want to encrypt. This action will bring up a context menu.
5. Select “Turn on BitLocker”:
- From the context menu, select the “Turn on BitLocker” option. BitLocker will now guide you through setting up encryption for the folder.
6. Choose How to Unlock:
- In the BitLocker setup window, you will be prompted to choose how to unlock the encrypted folder. Select the option “Use a password to unlock the drive.”
7. Enter a Password:
- Enter a strong and unique password for the folder encryption. Choosing a password that’s difficult to guess is crucial, combining uppercase and lowercase letters, numbers, and special characters.
8. Save the Recovery Key:
- BitLocker will prompt you to save a recovery key. This recovery key is essential because it’s the only way to unlock your folder if you forget the password. Save it in a secure location, such as a USB drive or a cloud storage service, and make sure it’s not easily accessible to others.
9. Start Encryption:
- After saving the recovery key, click “Next” and then click “Start encrypting.” BitLocker will initiate the encryption process, which may take some time depending on the folder size and your computer’s processing speed.
10. Access Your Folder: – Once the encryption process is complete, your folder is password-protected. You must enter your created password to access the files within the folder. Windows will prompt you to enter the password whenever you access this folder.
Using BitLocker to password-protect a folder provides strong security for sensitive files, as it encrypts the entire folder and its contents. However, it’s essential to remember your password or keep the recovery key safe, as there is no way to recover the data if both are lost.
Method 2: Password Protect a File Using 7-Zip

Another effective method to protect individual files with a password in Windows 10 is by using 7-Zip, a popular compression and archiving tool.
1. Install 7-Zip:
- If you don’t already have 7-Zip installed on your computer, you must download and install it. You can get the latest version of 7-Zip from the official website.
2. Select Files:
- Open the 7-Zip File Manager by searching for “7-Zip” in the Windows Start menu and selecting it from the search results. Once the 7-Zip File Manager is open, navigate to where the files you want to protect are located.
3. Navigate to the Files:
- Use the file manager to navigate to the files you want to password-protect. Click on the files to select them.
4. Create Archive:
- To create a password-protected archive containing your selected files, click the “Add” button in the 7-Zip File Manager’s toolbar. Alternatively, right-click the selected files and choose the “Add to archive” option from the context menu.
5. Set Archive Options:
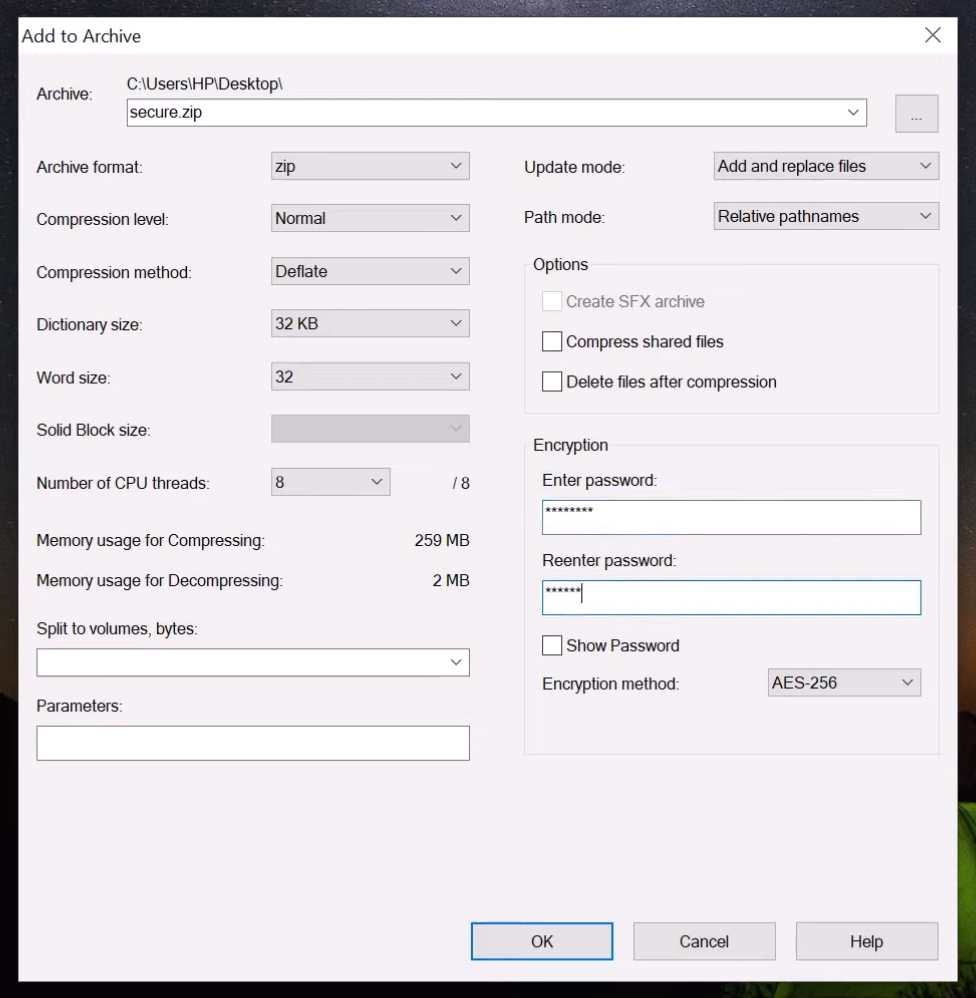
- In the “Add to Archive” window that appears, you’ll have several options to configure:
- Archive format: Choose your preferred archive format, such as ZIP or 7z.
- Archive-name: Specify a name for the archive file that will be created.
- Set password: Under the “Set password” section, enter a strong and secure password for the archive. It’s crucial to use a unique password that’s not easily guessable.
6. Create Archive:
- After configuring the archive options and setting the password, click the “OK” button to create the password-protected archive. 7-Zip will compress the selected files and apply password protection.
7. Access the Password-Protected File:
- Your password-protected archive is now ready. To access the files within it, double-click on the archive file. 7-Zip will prompt you to enter the password you set during creation. Once you enter the correct password, you can extract and access the files within the archive.
Using 7-Zip to create password-protected archives is a versatile method to secure individual or group files. It’s especially useful when sharing files securely, as you can send the password separately from the archive.
Conclusion:
These two methods, BitLocker and 7-Zip, effectively password-protect files and folders in Windows 10. BitLocker offers robust encryption for entire folders but may be overkill for some users. On the other hand, 7-Zip is a straightforward option for protecting individual files with passwords, making it a convenient choice for securing specific documents or archives. Depending on your security needs and preferences, you can choose the method that best suits your requirements to ensure the confidentiality of your sensitive information on your Windows 10 computer.
FAQs:
Can I password-protect any type of file in Windows 10?
Yes, you can password-protect various file types, including documents, spreadsheets, and images, in Windows 10.
Is it possible to change the password for a protected file later?
Yes, you can change the password for a protected file anytime by following a similar process to the one outlined in this guide.
What should I do if I forget the password for a protected file?
If you forget the password for a protected file, there is no way to recover it. Keep your passwords safe, and consider using a password manager.
Is there a limit to the length and complexity of the password I can use?
Windows 10 allows you to create strong, complex passwords. However, balancing complexity and ease of remembering is essential to avoid locking yourself out of your files.
