Introduction:
The best thing about Folder Lock is that it does not restrict itself to protecting only a single file or folder. It gives you the ultimate freedom of protecting ample amount of files, folders, and even entire drives. Folder Lock has two options that are commonly used. The basic concept is of password protection and the most profound type is its encryption standards. Between the two, the encryption option is rather more convenient and dependable to use. The process of locking files, folders and drives is as follows:
The Process of How to Lock files, folders and drives?
Folder Lock uses kernel level filtering and hooking on the files, folders and drives you lock with it, keeping them locked and hidden even in Safe Mode. You can simply drag and drop your favorite pictures, documents or videos in ‘Lock Files’ to lock them in seconds and keep a list of all of them in one place. No need to unlock or remove their protection to open them, simply double click to run them from Folder Lock while they are protected in the background. Later, you can simply go to ‘Lock Files’ and enter the correct password to unlock and unhide your files. Locking’ in Folder Lock refers to the process of protecting your files, folders, drives, and even programs by putting a protective lock on them. With the ‘Lock’ feature in place, any file, folder, drive, or an EXE program file that you have ‘Locked’, will be instantly hidden and locked from access and view.
Step 1
Before you can start Locking your files, folders, drives with Folder Lock, you will need to run Folder Lock and enter your Master Password that you have set during the installation.

A Master Password is a user-selected password or passphrase that a user sets when he/she first installs Folder Lock. As a result, ALL administrative rights to the program will belong to the user with the Master Password. Please remember that ONLY the Master Password holder can use the Lock Files feature.
You will have the option to enter your password using the Virtual Keyboard available. The Virtual Keyboard allows you to enter your password without the fear of your password being hacked into by a Keystroke recorder or Keyloggers.
Once you have entered the password to access your Locked files, click ‘OK’ to continue to the Lock Files list.
Step 2
Once you access the Lock Files feature, you will enter a main window showing a list of Locked files. Please note that this Locked files list will be empty if you are entering the Lock Files feature for the first time. You can add files, folders, drives to the Locking list by simply dragging and dropping them in Lock Files or by clicking the ‘Add’ button. Additionally, you can also Remove and Unlock or Lock certain items as needed. Once you enter the Lock Files list window, you can start adding your data for Locking.
Step 3
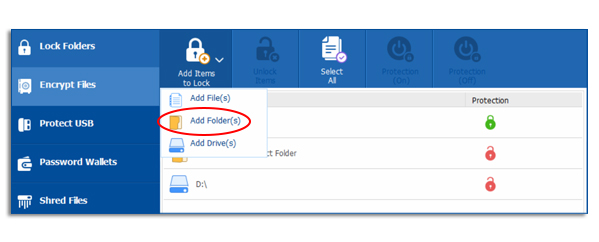
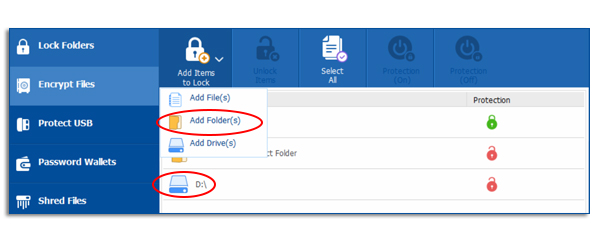
To add your files, folders, and drives to the Locking list, click on the ‘Add’ button on the top menu. You will then be given a pull down menu with options to add your files, folders, or drives.

To add Files to the Locking list, simply click on the ‘Add File(s)’ option in the pull down menu, and select your file(s). You can also select multiple files. Once you select your file(s), click on ‘Add’.

To add a Folder to the Locking list, simply click on the ‘Add Folder(s)’ option in the pull down menu, and select your folder(s). Once you select your folder(s), click ‘Add’.

To add a Drive to the Locking list, simply click on the ‘Add Drives(s)’ option in the pull down menu, and select your drive(s). Once you select your drive(s), click ‘Add’.

You can also add your files, folders and drives by dragging them anywhere from your computer and dropping them into the program window. As soon as the selected item is dropped, it gets listed in the Locked items.
Please note that you can Lock and Unlock individual items by just selecting the file, folder or drive and clicking on the ‘Lock’ or ‘Unlock’ button. This way, except for the file you selected and performed Locking and Unlocking operation on, the rest of the items in the locking list will remain Locked.
Also note that even though you can add folder(s) and drive(s) containing Locker files (flk, flka, flkb), you CANNOT add Locker files directly to the Locking list. Furthermore, all restricted files, folders, and drives, as well as System Drives, Virtual Drives, USB Drives, Memory Card, Camera, and any other external drives CANNOT be added to the Lock list for Lock protection.
As soon as you have added your selected file(s), folder(s), and/or drive(s) to the Locking list, the security setting of Locked and Hidden will both be applied to the items by default, which will make your Locked items both inaccessible (Locked) as well as hidden. Additionally, the security setting of ‘Settings > Preferences > Locking and Encryption > Set Locking ON for all unlocked items when I exit Folder Lock’ will also be applied to the listed Lock items by default (for full version only).
Note: When you add your drive(s) to the Locking list, the drive(s) will get added to the Locking list but WILL NOT be hidden. Furthermore, the ‘Lock’ and ‘Unlock’ function will also NOT work in the case of drive(s) under the Hidden security setting.
How do I remove the Lock from files, folders, and drives?
If you wish to unlock any files, folders, or drives, you can do so by simply running Folder Lock and going to the Lock Files feature. Just select the item you want unlock and click ‘Unlock’ from the Lock Files Menu.
Once you’re in the Lock Files feature, enter the Master Password to access the Lock Files list. From the list, click on any item and then press the ‘Remove’ button on the top menu in Folder Lock. If you are removing all the items from the Lock Files list by clicking on the Select All button, then as soon as you click on the Remove button, you will get a security prompt to confirm removal of those items. Click ‘Yes’ to confirm. After confirmation of removal, your selected items will be removed from the list and consequently unlocked permanently until you add them back to the Lock Files list.
Please be careful when selecting ‘Select All’ for removal as it WILL remove and unlock ALL items in the Lock list.
How do I change the Master password?
You can change your Master password by first running Folder Lock and going to the Settings panel. Once you’re in the Settings panel, go to the Password Security, you will see the ‘Change Master Password’ button on the screen. Simply click on this button and enter the current Master password in the Current Password field, enter new password in the New Password field and Confirm Password field. Now, press ‘Change’ to register the changes made.
Benefits of locking files:
Files when locked are hidden from their original location
You can protect folders, drives and even more with Folder Lock’s password protection feature
Password protection can be done by simple drag and drop feature
Drawbacks:
Files when in protected state can still be accessed from the backend processing
